


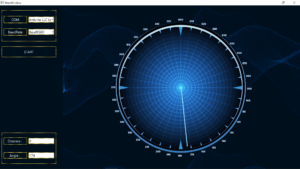
Dans ce tutorial on va apprendre à fabriquer un radar ressemblant au radar d’un avion. notre projet se compose de deux parties principales ; la première est la partie matérielle, qui permettra la collecte des données de détection, alors que la deuxième partie, celle du logiciel servira à récupérer les données entrantes en provenance du matériel, les analyser et les afficher à l’utilisateur .
Ainsi la partie matérielle est composer par une carte Arduino, un servomoteur, et un capteur ultrasonique. La série des capteur à ultrason HC-SR est utilisé pour mesurer les distances ou encore détecter les obstacles. Il est utilisé dans de nombreux projets robotiques, à titre d’exemple: les robots éviteurs d’obstacles.
Pour la partie logiciel, j’ai utiliser l’IDE Processing, vu ça simplicité d’utilisation et sa ressemblance avec l’IDE Arduino, en effet, Processing est un logiciel flexible et en même temps un langage pour apprendre à coder dans le contexte des arts visuels. Il y a des dizaines de milliers d’étudiants, d’artistes, de designers, de chercheurs et d’amateurs qui utilisent Processing pour l’apprentissage et le prototypage.
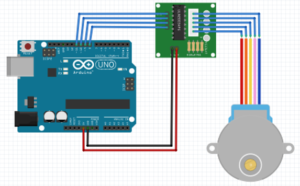
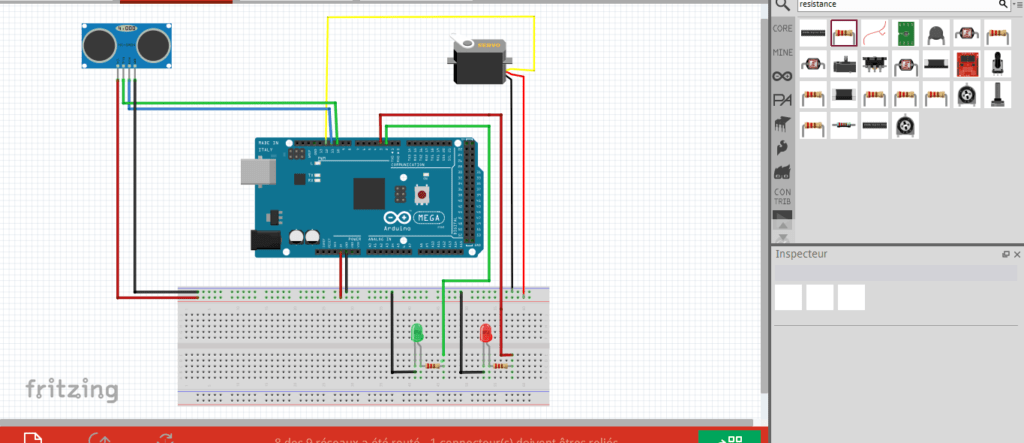
Schéma de branchement:
J’ai connecté le capteur à ultrasons HC-SR04 aux broches numéros 10 et 11 et le servomoteur à la broche 12 sur la carte Arduino.
Composants :
- Ultrasonic sensor HC- SR04
- Servo Motor
- Arduino Board
- Pin Header
- Breadboard and Jump Wires
- LED –red
- LED – green
- 2 resistances 220 ohm
Le principe de fonctionnement est simple, d’abord la carte Arduino fait tourner en permanence le servomoteur sur lequel on fixe notre capteur ultrasonique, et en même temps elle lit les distances retourner par le capteur HC-SR04. Dès que la distance est récupéré, l’Arduino va transfert cette distance ainsi que l’angle du servomoteur à notre ordinateur via la voie série, c’est-à-dire un câble usb.
Les données récupérées par l’ordinateur sauront exploiter par notre programme écrit sur Processing.
Nous devons maintenant créer un code et le charger sur la carte Arduino qui permettra l’interaction entre l’Arduino et l’IDE de traitement.
Voici le code source Arduino avec la description de chaque ligne du code:
J’ai utilisé la source du code Arduino de ce site: http://howtomechatronics.com/projects/arduino-radar-project/
// Includes the Servo library
#include <Servo.h>.
// Defines Tirg and Echo pins of the Ultrasonic Sensor
const int trigPin = 10;
const int echoPin = 11;
const int pin2=2;//green led
const int pin3=3; //led -red
// Variables for the duration and the distance
long duration;
int distance;
Servo myServo; // Creates a servo object for controlling the servo motor
void setup() {
  pinMode(trigPin, OUTPUT); // Sets the trigPin as an Output
  pinMode(echoPin, INPUT);// Sets the echoPin as an Input
  pinMode(pin2, OUTPUT);
  pinMode(pin3, OUTPUT);
  Serial.begin(9600);
  myServo.attach(12); // Defines on which pin is the servo motor attached
}
void loop() {
  // rotates the servo motor from 15 to 165 degrees
  for(int i=15;i<=165;i++){
  myServo.write(i);

  delay(30);
  distance = calculateDistance();// Calls a function for calculating the distance measured by the Ultrasonic sensor for each degree
   Serial.print(i); // Sends the current degree into the Serial Port
  Serial.print(","); // Sends addition character right next to the previous value needed later in the Processing IDE for indexing
  Serial.print(distance); // Sends the distance value into the Serial Port
  Serial.print("."); // Sends addition character right next to the previous value needed later in the Processing IDE for indexing
  if (distance <50){digitalWrite(pin2, HIGH);delay(100);digitalWrite(pin2, LOW);}else {digitalWrite(pin3, HIGH);delay(100);digitalWrite(pin3, LOW);}}
  // Repeats the previous lines from 165 to 15 degrees
  for(int i=165;i>15;i--){
  myServo.write(i);

  distance = calculateDistance();
  Serial.print(i);
  delay(30);
  Serial.print(",");
  delay(30);
  Serial.print(distance);
  delay(30);
  Serial.print(".");
  if (distance <50){digitalWrite(pin2, HIGH);delay(100);digitalWrite(pin2, LOW);}else {digitalWrite(pin3, HIGH);delay(100);digitalWrite(pin3, LOW);}
  }
}
// Function for calculating the distance measured by the Ultrasonic sensor
int calculateDistance(){

  digitalWrite(trigPin, LOW);
  delayMicroseconds(2);
  // Sets the trigPin on HIGH state for 10 micro seconds
  digitalWrite(trigPin, HIGH);
  delayMicroseconds(10);
  digitalWrite(trigPin, LOW);
  duration = pulseIn(echoPin, HIGH); // Reads the echoPin, returns the sound wave travel time in microseconds
  distance= duration*0.034/2;
  return distance;
 }
Processing Source Code
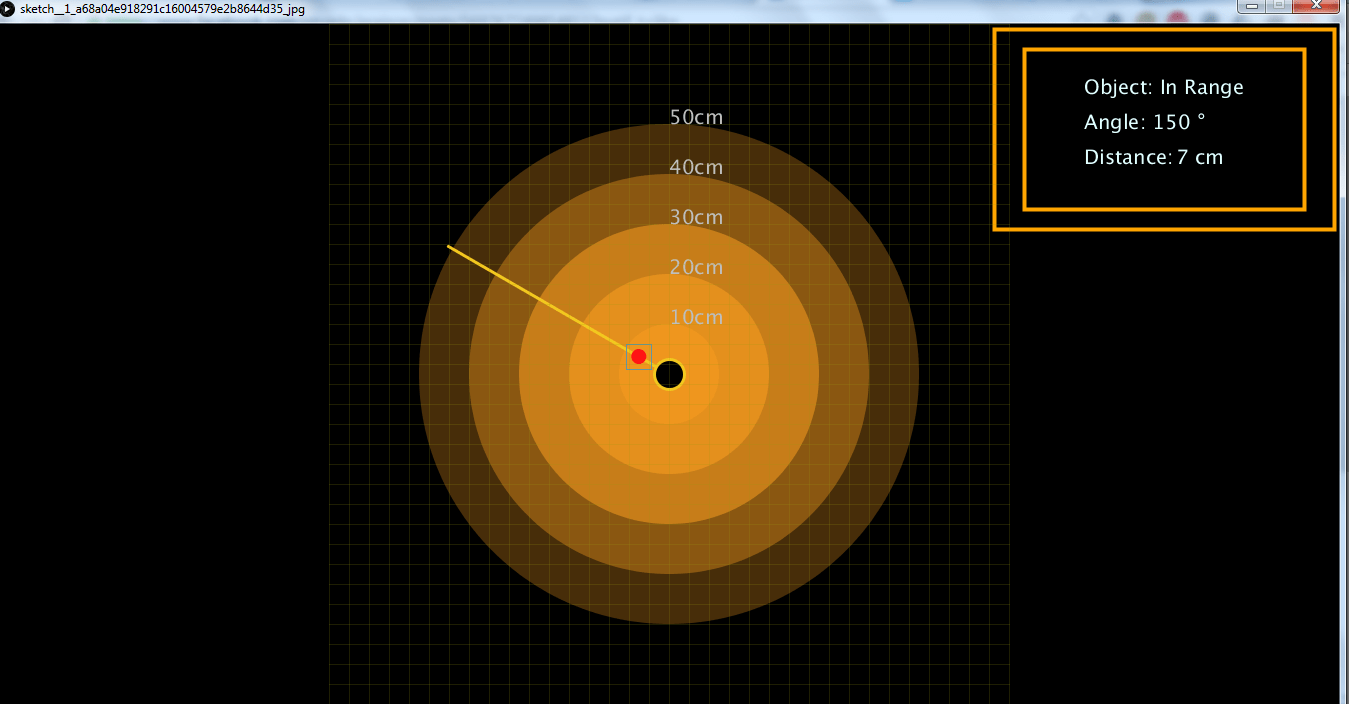
Maintenant, nous allons recevoir les valeurs de l’angle et de la distance mesurées par le capteur de la carte Arduino dans l’IDE de traitement en utilisant la fonction SerialEvent () qui lit les données du port série et nous mettrons les valeurs de l’angle et de la distance dans les variables iAngle et iDistance. Ces variables seront utilisées pour dessiner le radar, les lignes, les objets détectés et une partie du texte.
import processing.serial.*; // imports library for serial communication
import java.awt.event.KeyEvent; // imports library for reading the data from the serial port
import java.io.IOException;
Serial myPort; // defines Object Serial
// defubes variables
String angle="";
String distance="";
String data="";
String noObject;
float pixsDistance;
int A, D;
int index1=0;
int index2=0;
int i;
void setup() {

 size (1340, 700); // ***CHANGE THIS TO YOUR SCREEN RESOLUTION***
 smooth();

  myPort = new Serial(this,"COM7", 9600); // starts the serial communication
  myPort.bufferUntil('.'); // reads the data from the serial port up to the character '.'. So actually it reads this: angle,distance.

}
//-------------------------------------------------------
void draw() {
  background(0);
  // calls the functions for drawing the radar
    drawRadar();
    drawLine();
drawObject();
fill(224,255,255);
drawText();
for (i=0;i<1340;i+=20){

  strokeWeight(1);
  stroke(155,155,13,50);
line(330,i,1010,i);
}for (i=0;i<700;i+=20){
    strokeWeight(1);
  stroke(155,155,13,50);
line(330+i,0,330+i,700);
}
  fill(242,152,31,200); // green color


}
//------------------------------------------------------
void serialEvent (Serial myPort) { // starts reading data from the Serial Port
  // reads the data from the Serial Port up to the character '.' and puts it into the String variable "data".
  data = myPort.readStringUntil('.');
  data = data.substring(0,data.length()-1);

  index1 = data.indexOf(","); // find the character ',' and puts it into the variable "index1"
  angle= data.substring(0, index1); // read the data from position "0" to position of the variable index1 or thats the value of the angle the Arduino Board sent into the Serial Port
  distance= data.substring(index1+1, data.length()); // read the data from position "index1" to the end of the data pr thats the value of the distance

  // converts the String variables into Integer
  A = int(angle);
  D = int(distance);if(D<50){
}
}
//-------------------------------------------------------
void drawRadar() {

   // moves the starting coordinats to new location
  fill(242,152,31,200);
    noStroke();
      ellipse(670,350,100,100);
      fill(242,152,31,175);
    noStroke();
        ellipse(670,350,200,200);
        fill(242,152,31,150);
    noStroke();
    ellipse(670,350,300,300);
    fill(242,152,31,100);
    noStroke();
    ellipse(670,350,400,400);
    fill(242,152,31,75);
    noStroke();
    ellipse(670,350,500,500);
     fill(190);
  textSize(20);

  text("50cm",670,100);
  text("40cm",670,150);
  text("30cm",670,200);
  text("20cm",670,250);
  text("10cm",670,300);
  textSize(40);
}
//-------------------------------------------------------
    void drawLine() {

  pushMatrix();
  strokeWeight(3);
  stroke(242,200,31,255);
  translate(width/2,height/2); // moves the starting coordinats to new location
  line(0,0,(255)*cos(radians(A)),-(255)*sin(radians(A)));// draws the line according to the angle
  fill(0);
  ellipse(0,0,30,30);
  popMatrix();
}
//--------------------------------------------------------
void drawObject() {

  pushMatrix();
  translate(width/2,height/2); // moves the starting coordinats to new location
  noStroke(); // red color
  pixsDistance = D*5; // covers the distance from the sensor from cm to pixels
  // limiting the range to 40 cms
  if(D<50){

    // draws the object according to the angle and the distance
    fill(255,20,20);
  ellipse(pixsDistance*cos(radians(A)),-pixsDistance*sin(radians(A)),20,20);
      strokeWeight(1);
      stroke(55,150,200,200);
  noFill();
  rectMode(CENTER);
  rect(pixsDistance*cos(radians(A)),-pixsDistance*sin(radians(A)),25,25);
  }
  popMatrix();
}
//-----------------------------------------------------------------------------------
//-----------------------------------------------------------------------------------
void drawText() { // draws the texts on the screen

  pushMatrix();
  if(D>40) {
  noObject = "Out of Range";
  }
  else {
      noObject = "In Range";
  }

  textSize(20);
  text("Object: " + noObject, width*0.81, height*0.1);
  text("Angle: " + A +" °", width*0.81, height*0.15);
  text("Distance: ", width*0.81, height*0.2);
  if(D<50) {
  text("        " + D +" cm", width*0.84, height*0.2);
  }
  strokeWeight(4);
  stroke(255,165,0,255);
  noFill();
 rectMode(RADIUS);
  rect(width*0.87, height*0.15,170,100);
  rect(width*0.87, height*0.15,140,80);
  popMatrix();
}


+ There are no comments
Add yours